Butterfly 安裝文档(四) 主题配置-2
文档
Math 數學
不要在標題裏使用 mathjax 語法,toc 目錄不一定能正確顯示 mathjax,可能顯示 mathjax 代碼
建議使用 KaTex 獲得更好的效果,下文有介紹!
修改 主題配置文件:
1 | mathjax: |
如果
per_page設為true,則每一頁都會加載 Mathjax 服務。設為false,則需要在文章Front-matter添加mathjax: true,對應的文章才會加載 Mathjax 服務。
然後你需要修改一下默認的 markdown 渲染引擎來實現 MathJax 的效果。
以下操作在你 hexo 博客的目錄下 (不是 Butterfly 的目錄):
安裝插件
1
2npm uninstall hexo-renderer-marked --save
npm install hexo-renderer-kramed --save配置 hexo 根目錄的配置文件
1
2
3
4
5
6
7
8kramed:
gfm: true
pedantic: false
sanitize: false
tables: true
breaks: true
smartLists: true
smartypants: true
效果:
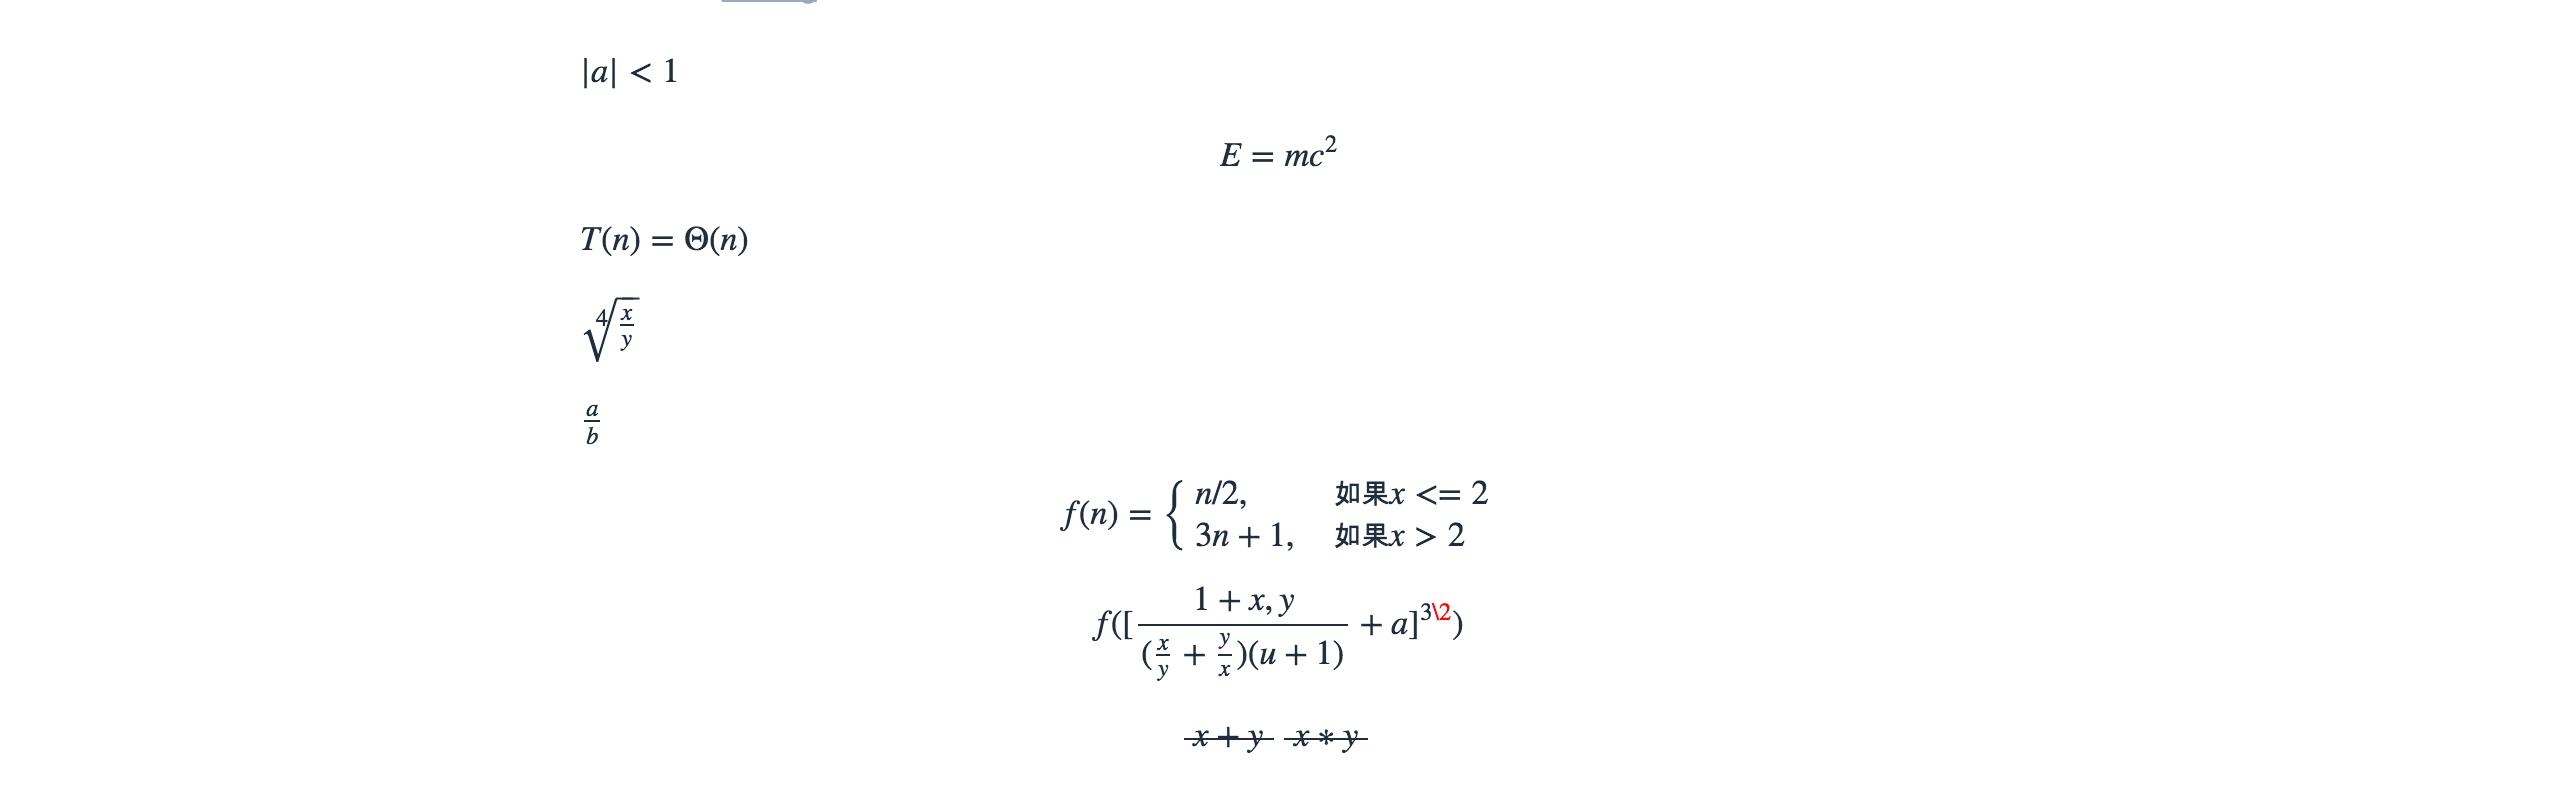
不要在標題裏使用 KaTeX 語法,toc 目錄不能正確顯示 KaTeX。
首先禁用MathJax(如果你配置過 MathJax 的話),然後修改你的主題配置文件以便加載katex.min.css:
1 | katex: |
你不需要添加 katex.min.js 來渲染數學方程。相應的你需要卸載你之前的 hexo 的 markdown 渲染器,然後安裝其它插件。
卸載掉 marked 插件,安裝 hexo-renderer-markdown-it
1 | npm un hexo-renderer-marked --save # 如果有安裝這個的話,卸載 |
在 hexo 的根目錄的 _config.yml 中配置
1 | markdown: |
如需配置其它參數,請參考 katex 官網
注意,此方法生成的 katex 沒有斜體
卸載掉 marked 插件,然後安裝新的hexo-renderer-markdown-it-plus:
1 | # 替換 `hexo-renderer-kramed` 或者 `hexo-renderer-marked` 等hexo的markdown渲染器 |
注意到 hexo-renderer-markdown-it-plus已經無人持續維護, 所以我們使用 @upupming/hexo-renderer-markdown-it-plus。 這份 fork 的代碼使用了 @neilsustc/markdown-it-katex同時它也是 VSCode 的插件 Markdown All in One所使用的, 所以我們可以獲得最新的 KaTex 功能例如 \tag{}。
你還可以通過 @neilsustc/markdown-it-katex控制 KaTeX 的設置,所有可配置的選項參見 https://katex.org/docs/options.html。 比如你想要禁用掉 KaTeX 在命令行上輸出的宂長的警告信息,你可以在根目錄的 _config.yml 中使用下面的配置將 strict 設置為 false:
1 | markdown_it_plus: |
當然,你還可以利用這個特性來定義一些自己常用的 macros。
因為 KaTeX 更快更輕量,因此沒有 MathJax 的功能多(比如右鍵菜單)。為那些使用 MathJax 的用户,主題也內置了 katex 的 複製 功能。
搜索
記得運行 hexo clean
如果你使用 hexo-algoliasearch,請記得配置 fields 參數的
title,permalink和content
你需要安裝 hexo-algolia或 hexo-algoliasearch. 根據它們的説明文檔去做相應的配置。
修改
主題配置文件
1 | algolia_search: |
記得運行 hexo clean
你需要安裝 hexo-generator-searchdb 或者 hexo-generator-search,根據它的文檔去做相應配置
修改
主題配置文件
1 | # Local search |
| 參數 | 解釋 |
|---|---|
| enable | 是否開啟本地搜索 |
| preload | 預加載,開啟後,進入網頁後會自動加載搜索文件。關閉時,只有點擊搜索按鈕後,才會加載搜索文件 |
| top_n_per_article | 匹配的文章結果,默認顯示最開始的 1段結果 |
| unescape | 將 html 字符串解碼為可讀字符串 |
| CDN | 搜索文件的 CDN 地址(默認使用的本地鏈接) |
DocSearch 是另一款由 algolia 提供的搜索服務,具體申請和使用請查看 DocSearch 文檔
1 | docsearch: |
| 參數 | 解釋 |
|---|---|
| enable | 【必須】是否開啟 docsearch |
| appId | 【必須】你的 Algolia 應用 ID |
| apiKey | 【必須】你的 Algolia 搜索 API key |
| indexName | 【必須】你的 Algolia index name |
| option | 【可選】其餘的 docsearch 配置 |
| 具體配置可查這裏 |

分享
只能選擇一個分享服務商
如果你不知道 sharejs,看看它的説明。
修改 主題配置文件
1 | sharejs: |

可以到addtoany查看使用説明
1 | addtoany: |

評論
從3.0.0開始,開啟評論需要在comments-use中填寫你需要的評論。
支持雙評論顯示,只需要配置兩個評論(第一個為默認顯示)
1 | comments: |
參數 解釋
use 使用的評論(請注意,最多支持兩個,如果不需要請留空)
注意:雙評論不能是 Disqus 和 Disqusjs 一起,由於其共用同一個 ID,會出錯
text 是否顯示評論服務商的名字
lazyload 是否為評論開啟lazyload,開啟後,只有滾動到評論位置時才會加載評論所需要的資源(開啟 lazyload 後,評論數將不顯示)
count 是否在文章頂部顯示評論數
livere、Giscus 和 utterances 不支持評論數顯示
card_post_count 是否在首頁文章卡片顯示評論數
gitalk、livere 、Giscus 和 utterances 不支持評論數顯示
單評論
雙評論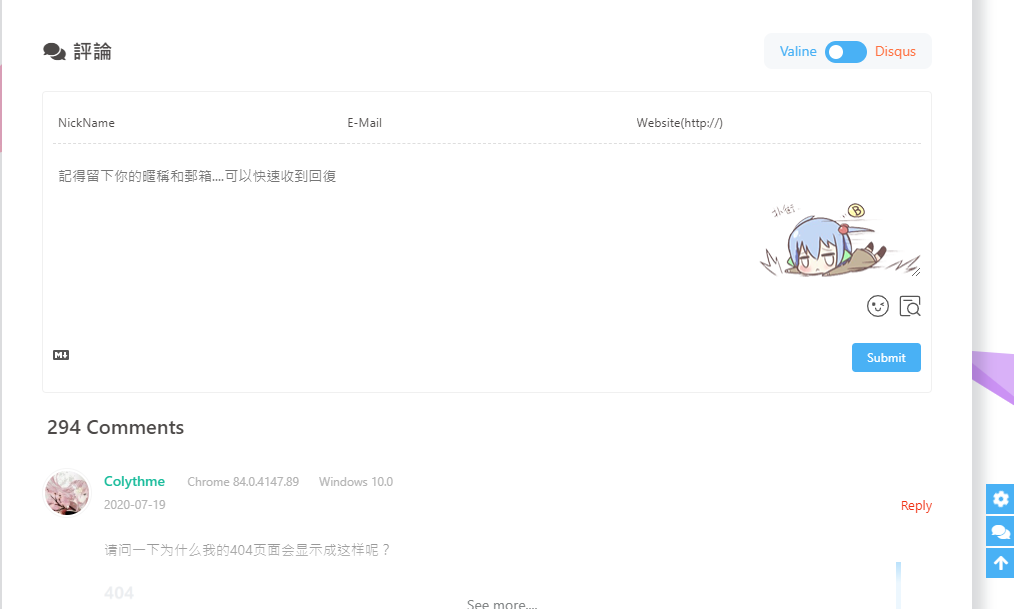
顯示text
不顯示text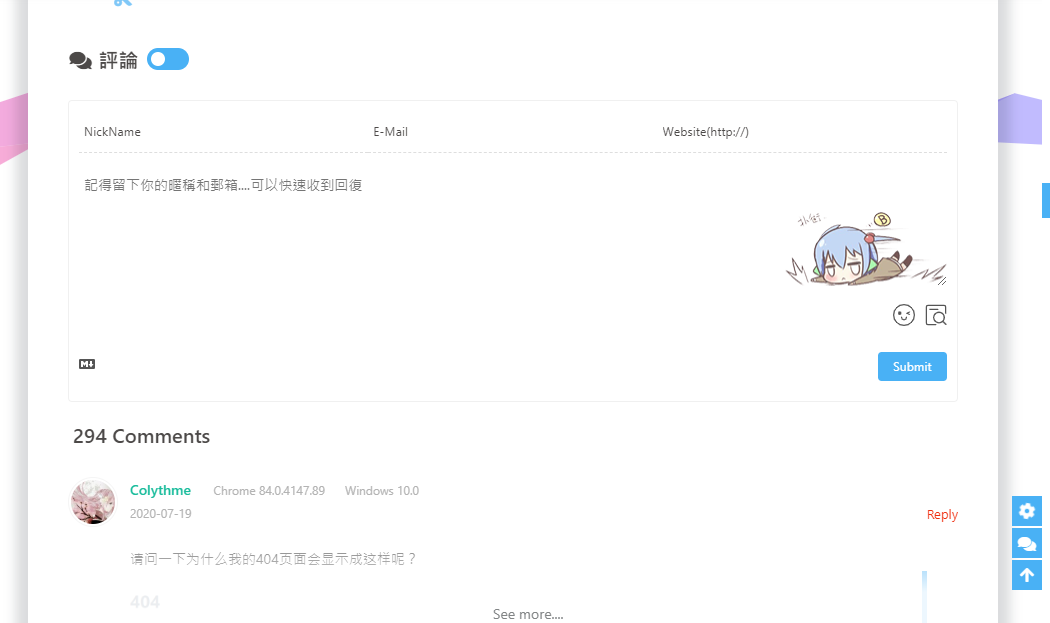
livere(来必力)
註冊來必力,配置你自己的來必力設置,然後在Butterfly裏開啟它。
修改 主題配置文件
1 | livere: |
laibili 的 uid 你能在這裏找到: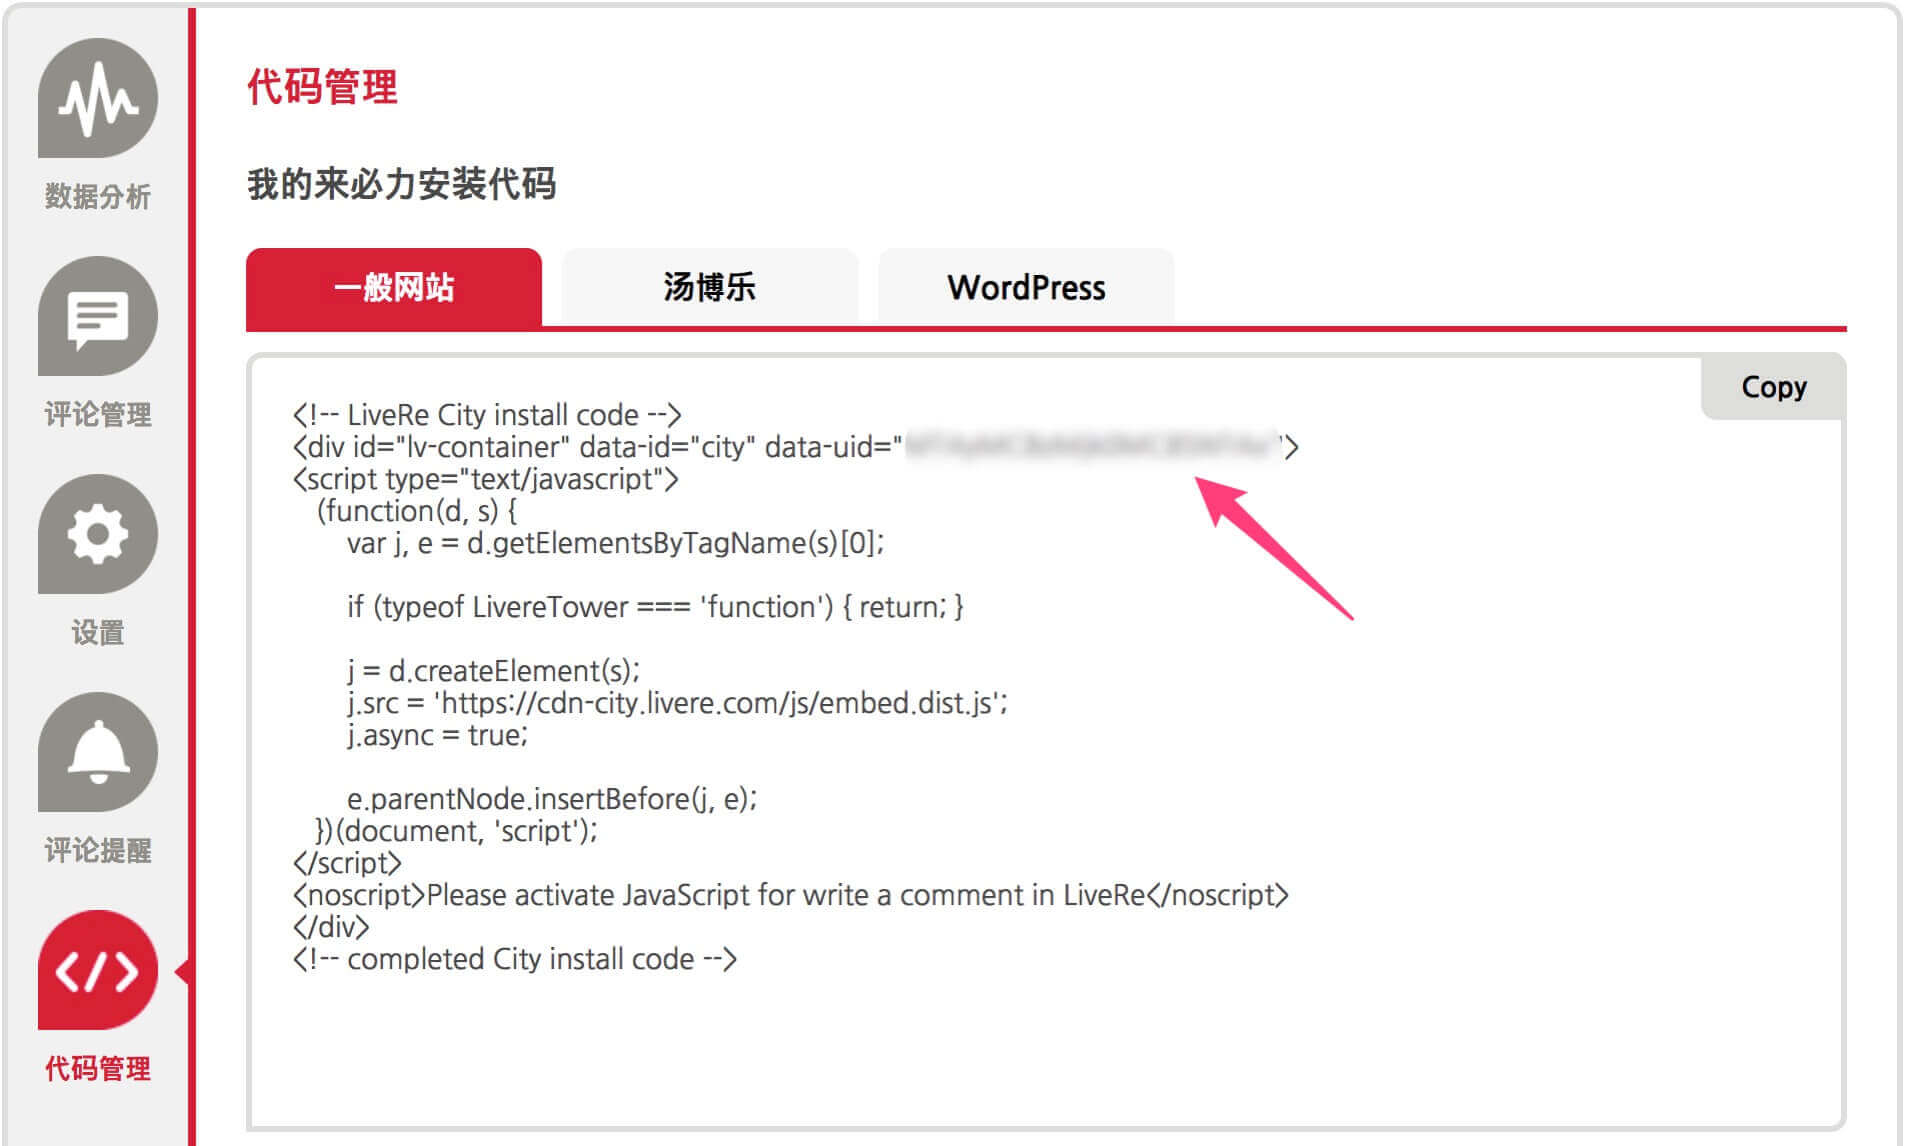

disqus
註冊 disqus,配置你自己的 disqus,然後在Butterfly裏開啟它。
修改 主題配置文件
1 | disqus: |

在綫聊天
從3.0開始,Butterfly主題內置了多種在綫聊天工具。你可以選擇開啟一種,方便你與訪客的交流。
這些工具都提供了一個按鈕可以打開/關閉聊天窗口。
主題也提供了一個集合主題特色的按鈕來替換這些工具本身的按鈕,這個聊天按鈕將會出現在右下角裏。
你只需要把chat_btn打開就行。
修改 主題配置文件
1 | # Chat Button [recommend] |
為了不影響訪客的體驗,主題提供一個chat_hide_show配置
設為true後,使用工具提供的按鈕時,只有向上滾動才會顯示聊天按鈕,向下滾動時會隱藏按鈕。
修改 主題配置文件
1 | # The origin chat button is displayed when scrolling up, and the button is hidden when scrolling down |
如果使用工具自帶的聊天按鈕,按鈕位置可能會遮擋右下角圖標,請配置rightside_bottom調正右下角圖標位置
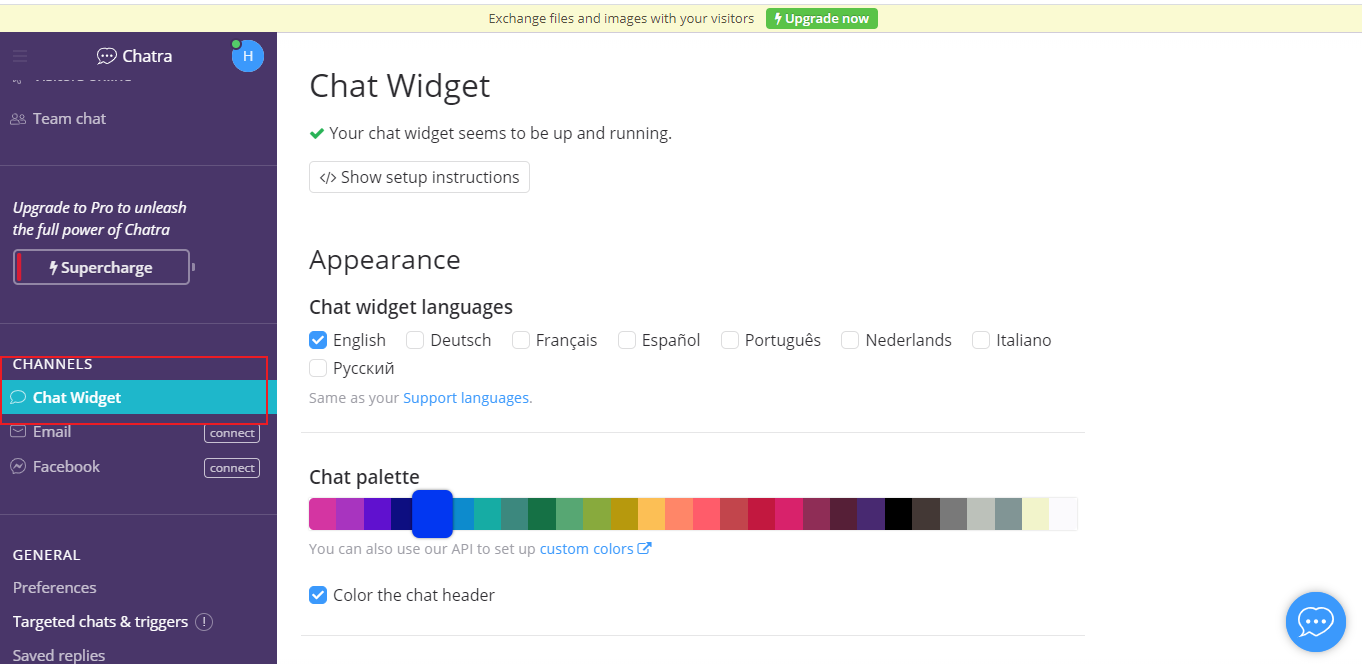
配置chatra,需要知道Public key
打開chatra並註冊賬號。
你可以在Preferences中找到Public key

修改 主題配置文件
1 | # chatra |
chatra的樣式你可以Chat Widget自行配置
Demo

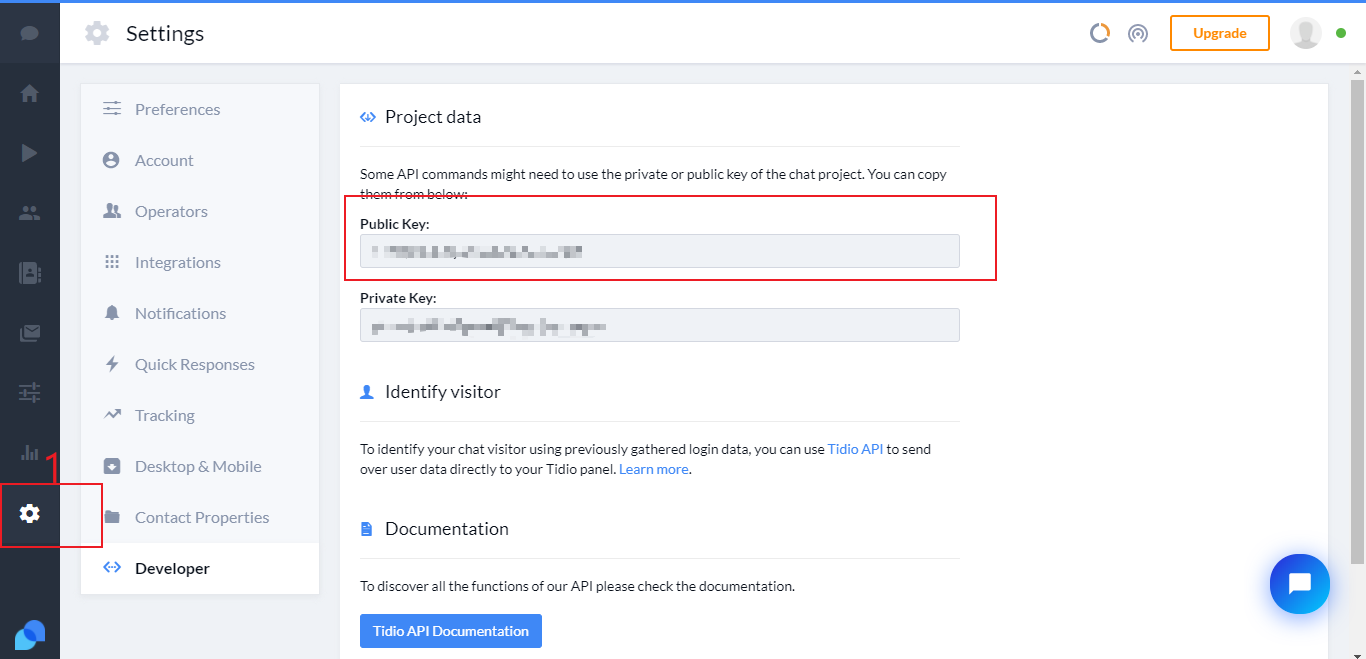
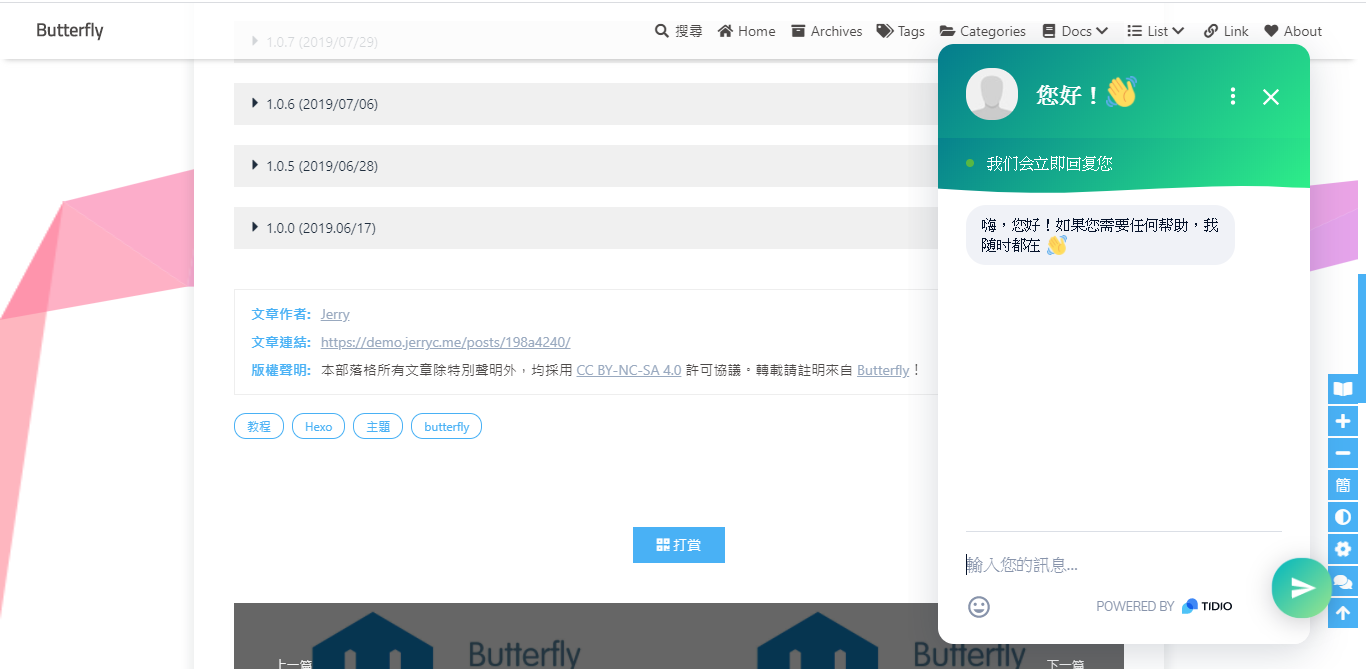
配置tidio,需要知道Public key
打開tidio並註冊賬號。
你可以在Preferences > Developer中找到Public key
修改 主題配置文件
1 | # tidio |
tidio的樣式你可以Channels自行配置
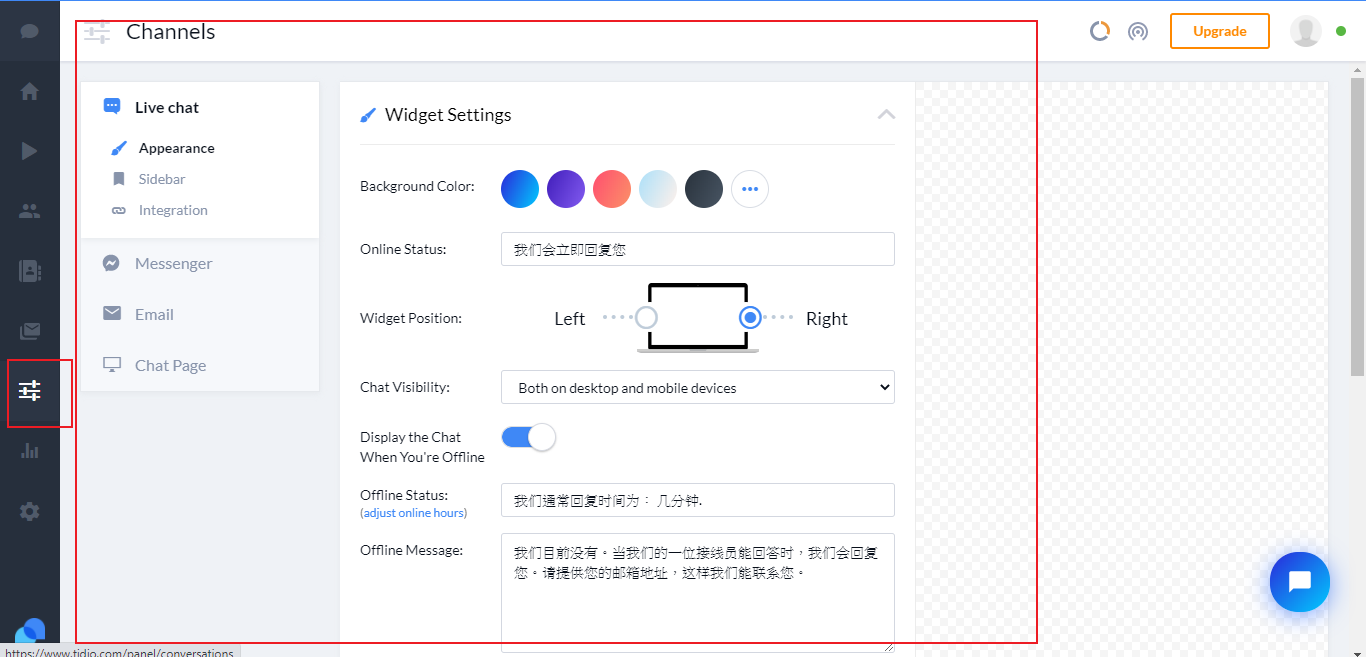
Demo
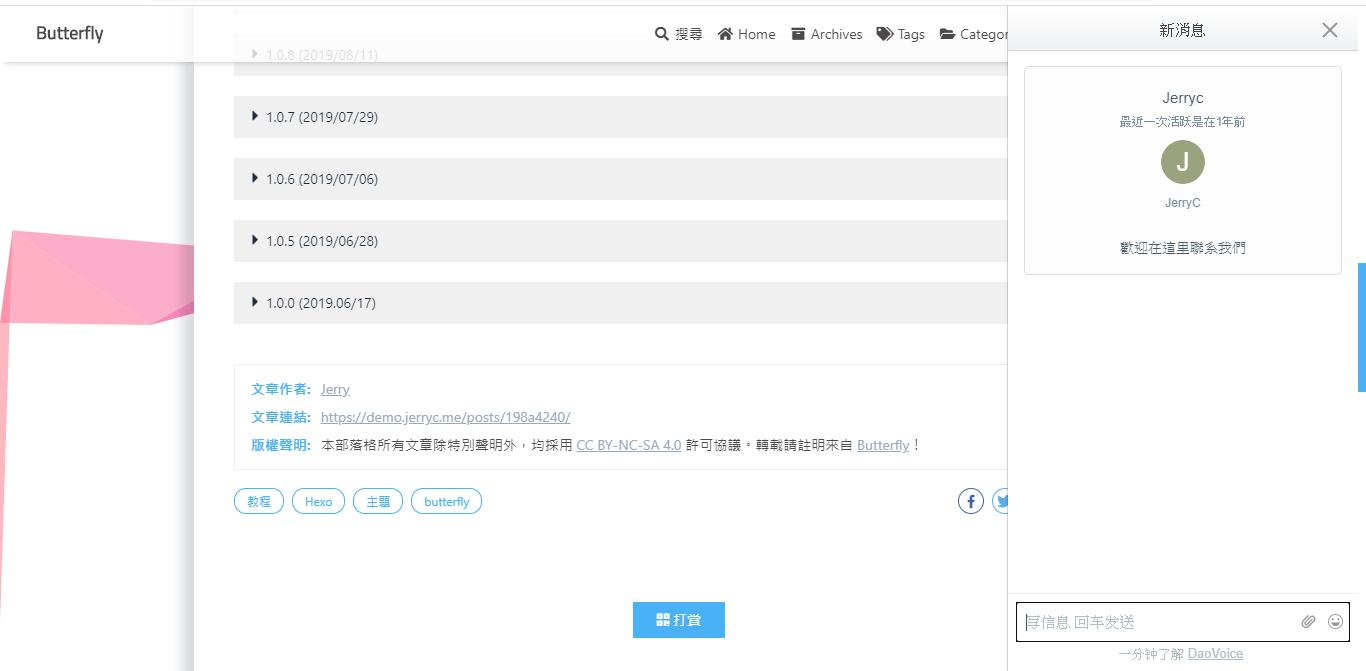
打開daovoice和註冊帳號
找到你的app id
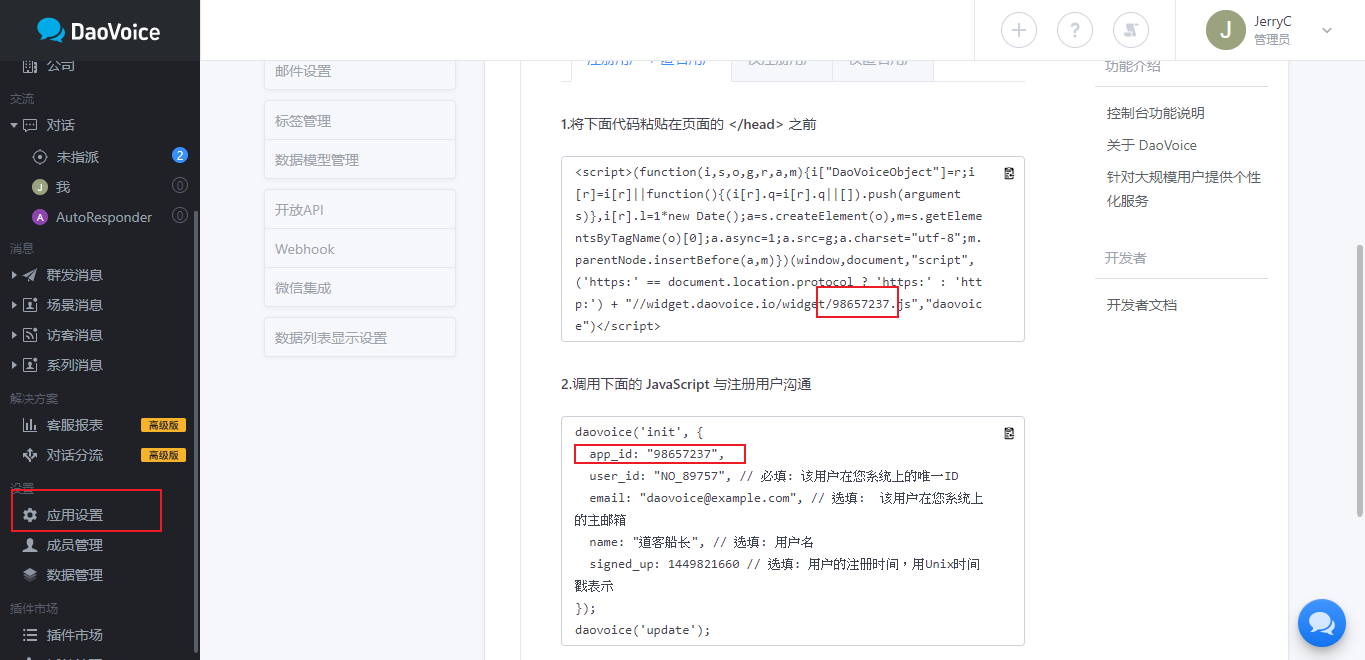
修改 主題配置文件
1 | # daovoice |
可在聊天設置裏配置聊天按鈕等樣式

Demo
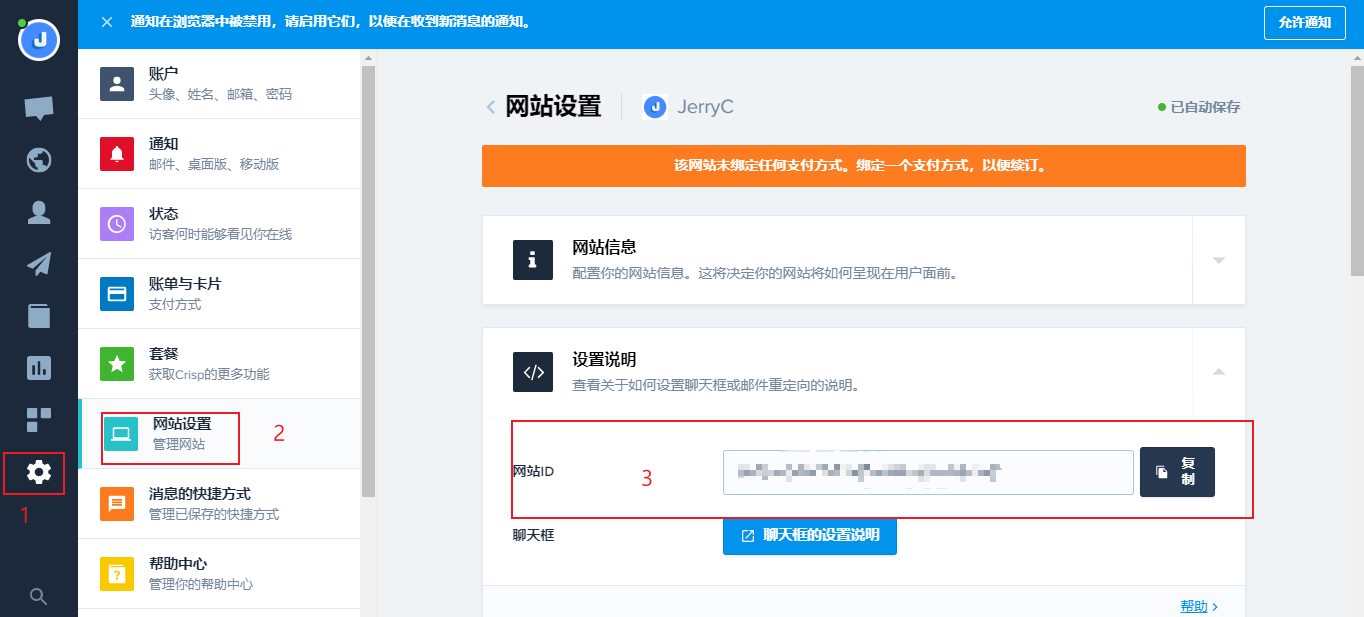
打開crisp並註冊帳號
找到需要的網站ID
1 | # crisp |

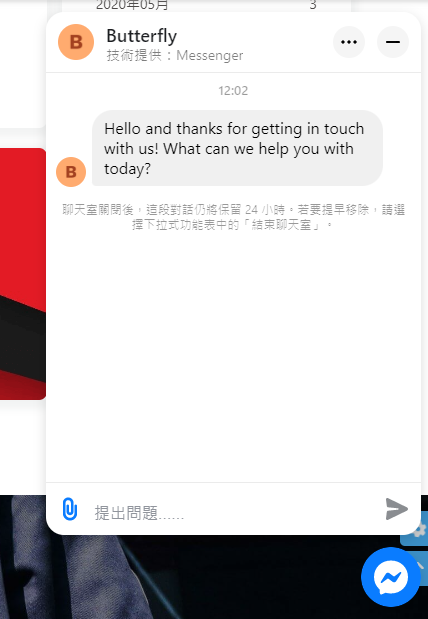
messenger 為 Facebook 旗下的聊天服務
具體操作請查看 Facebook 洽談附加程式 - Messenger 平台
1 | messenger: |
分析統計
登錄百度統計的官方網站
找到你百度統計的統計代碼
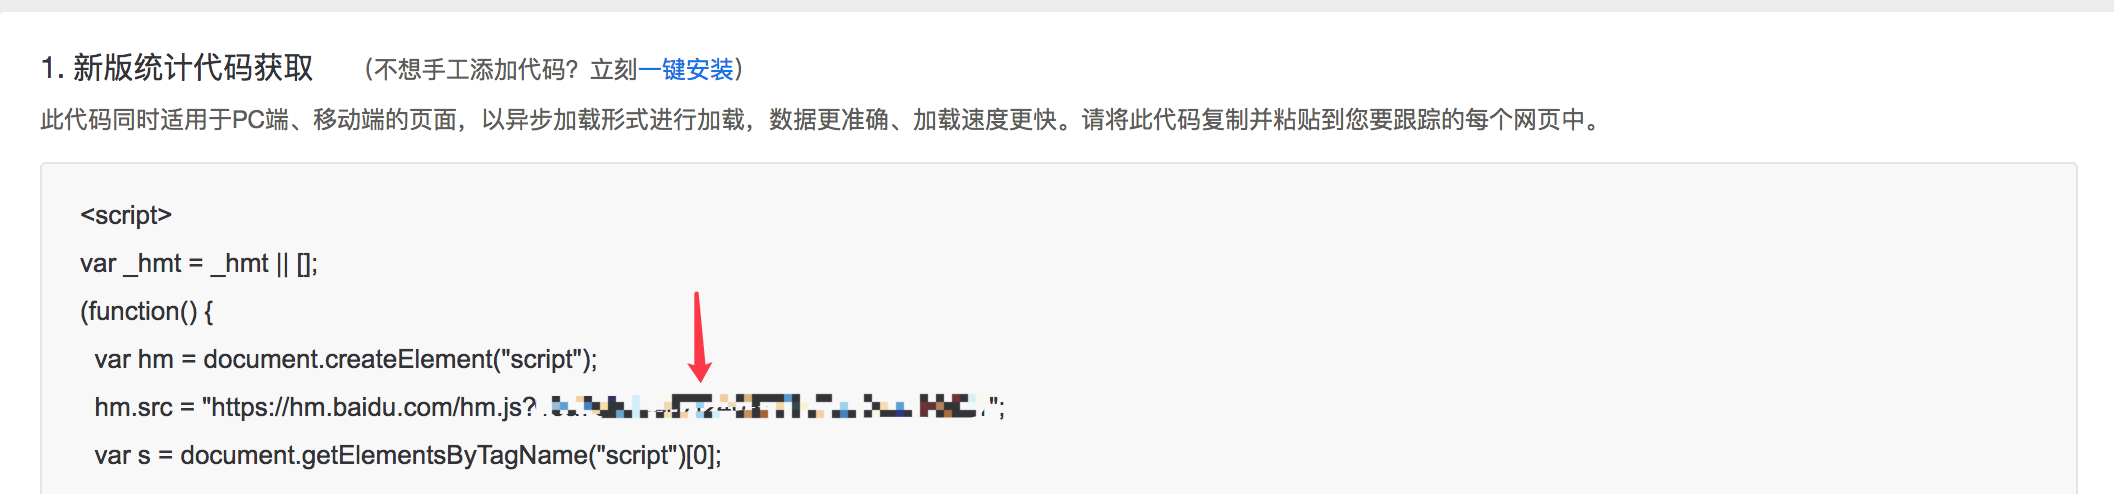
- 修改
主題配置文件
1 | baidu_analytics: 你的代碼 |
登錄谷歌分析的官方網站
找到你的谷歌分析的跟蹤 ID

- 修改
主題配置文件
1 | google_analytics: 你的代碼 # 通常以`UA-`打頭 |
- 登錄 Cloudflare 分析的官方網站
- 找到
JavaScript 程式碼片段 - 找到你的
token
修改
主題配置文件1
2
3# Cloudflare Analytics
# https://www.cloudflare.com/zh-tw/web-analytics/
cloudflare_analytics:登錄 Clarity 的官方網站
創建
PROJECT找到你的
ID
修改
主題配置文件1
2
3# Microsoft Clarity
# https://clarity.microsoft.com/
microsoft_clarity:
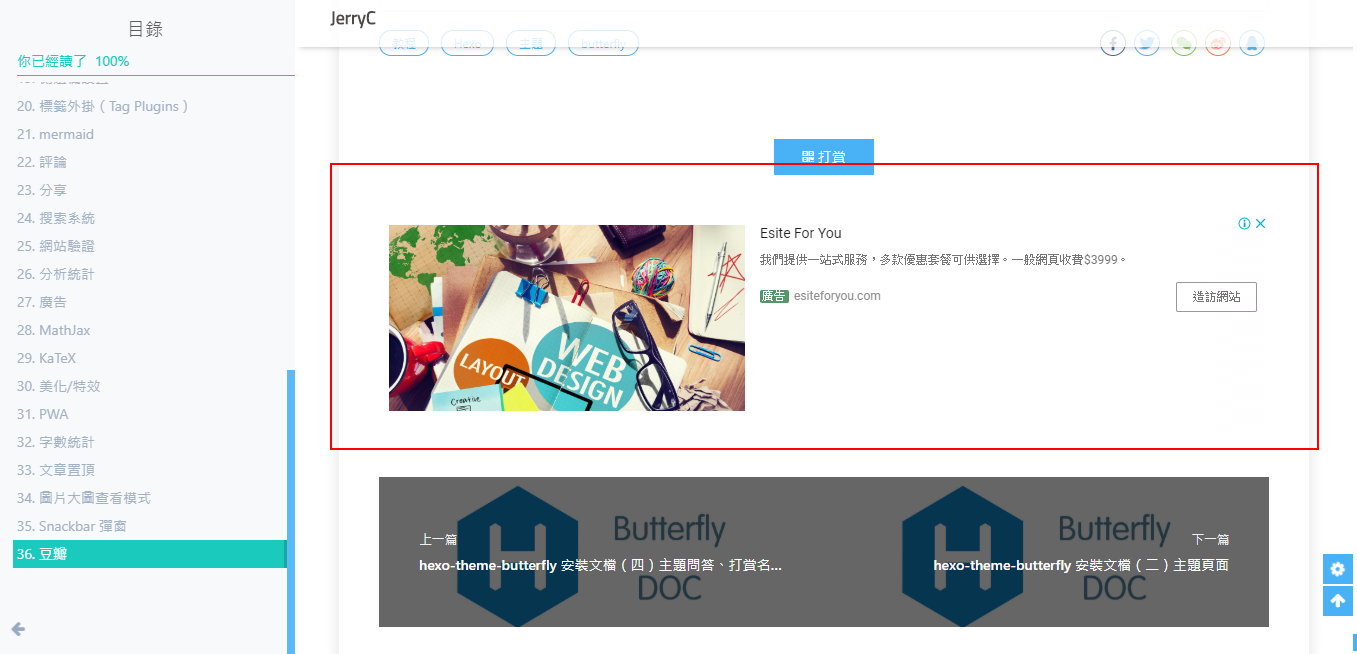
廣告
主題已集成谷歌廣告(自動廣告)
修改 主題配置文件
1 | google_adsense: |

主題預留了三個位置可供插入廣告,分別為主頁文章(每三篇文章出現廣告)/aside公告之後/文章頁打賞之後。
把html代碼填寫到對應的位置
修改 主題配置文件
1 | ad: |
例如:
1 | index: <ins class="adsbygoogle" style="display:block" data-ad-format="fluid" data-ad-layout-key="xxxxxxxxxxxx" data-ad-client="ca-pub-xxxxxxxxxx" data-ad-slot="xxxxxxxxxx"></ins><script>(adsbygoogle=window.adsbygoogle||[]).push({})</script> |
網站驗證
如果需要搜索引擎收錄網站,可能需要登錄對應搜索引擎的管理平台進行提交。
各自的驗證碼可從各自管理平台拿到
修改 主題配置文件
1 | site_verification: |
美化/特效
自定義主題色
可以修改大部分UI顏色
修改 主題配置文件,比如:
顏色值必須被雙引號包裹,就像
"#000"而不是#000。否則將會在構建的時候報錯!
1 | theme_color: |
主頁top_img顯示大小
適用於 版本號 >= V1.2.0
默認的顯示為全屏。site-info的區域會居中顯示
1 | # 主頁設置 |
注意:index_top_img_height的值不能使用百分比。
2個都不填的話,會使用默認值
舉例,當
1 | index_top_img_height: 400px |
效果
文字左右對齊
可設置文字向兩側對齊,對最後一行無效
1 | # Stretches the lines so that each line has equal width(文字向兩側對齊,對最後一行無效) |
text_align_justify: false
text_align_justify: true
網站背景
默認顯示白色,可設置圖片或者顏色
修改 主題配置文件
1 | # 圖片格式 url(http://xxxxxx.com/xxx.jpg) |
留意: 如果你的網站根目錄不是’/‘,使用本地圖片時,需加上你的根目錄。
例如:網站是 https://yoursite.com/blog,引用一張img/xx.png圖片,則設置background為 `url(/blog/img/xx.png)
background:’#49B202’
background: url(https://jgwy.com/img/hexo-theme-butterfly-doc-set-body-background-color.png)

footer 背景
修改 主題配置文件
1 | # footer是否顯示圖片背景(與top_img一致) |
| 配置的值 | 效果 |
|---|---|
| 留空/false | 顯示默認的顔色 |
| img鏈接 | 圖片的鏈接,顯示所配置的圖片 |
| 顔色( | |
| HEX值 - #0000FF | |
| RGB值 - rgb(0,0,255) | |
| 顔色單詞 - orange | |
| 漸變色 - linear-gradient( 135deg, #E2B0FF 10%, #9F44D3 100%) | |
| ) | 對應的顔色 |
| true | 顯示跟 top_img 一樣 |
true

打字效果
修改 主題配置文件
1 | # Typewriter Effect (打字效果) |
背景特效
好看的綵帶背景,可設置每次刷新更換綵帶,或者每次點擊更換綵帶
修改 主題配置文件
1 | canvas_ribbon: |
相關配置可查看canvas_ribbon

好看的綵帶背景,會飄動
修改 主題配置文件
1 | canvas_fluttering_ribbon: |

修改 主題配置文件
1 | canvas_nest: |

鼠標點擊效果
zIndex建議只在-1和9999上選-1 代表煙火效果在底部9999 代表煙火效果在前面
修改 主題配置文件
1 | fireworks: |
修改 主題配置文件
1 | # 點擊出現愛心 |
修改 主題配置文件
1 | # 點擊出現文字,文字可自行修改 |
頁面美化
會改變ol、ul、h1-h5的樣式
field配置生效的區域
post只在文章頁生效site在全站生效
修改 主題配置文件
1 | # 美化頁面顯示 |
title-prefix-icon填寫的是fontawesome的icon的Unicode數。
未開啟美化
開啟美化
自定義字體和字體大小
全局字體
可自行設置字體的font-family
如不需要配置,請留空
修改 主題配置文件
1 | # Global font settings |
Blog 標題字體
可自行設置字體的font-family
如不需要配置,請留空。
如不需要使用網絡字體,只需要把font_link留空就行
修改 主題配置文件
1 | # Font settings for the site title and site subtitle |
網站副標題
可設置主頁中顯示的網站副標題或者喜歡的座右銘。
修改 主題配置文件
1 | # 主頁subtitle |

頁面加載動畫 preloader
當進入網頁時,因為加載速度的問題,可能會導致 top_img 圖片出現斷層顯示,或者網頁加載不全而出現等待時間,開啟preloader後,會顯示加載動畫,等頁面加載完,加載動畫會消失。
主題支持 pace.js 的加載動畫,具體可查看 pace.js
配置 butterly.yml
1 | # 加載動畫 Loading Animation |
fullpage-loading

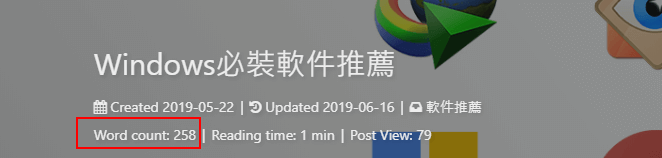
字數統計
要為Butterfly配上字數統計特性, 你需要如下幾個步驟:
打開 hexo 工作目錄
npm install hexo-wordcount --saveoryarn add hexo-wordcount修改
主題配置文件:
1 | wordcount: |
圖片大圖查看模式
只能開啟一個
如果你並不想為某張圖片添加大圖查看模式,你可以使用 html 格式引用圖片,併為圖片添加 no-lightbox class 名。
修改 主題配置文件
1 | # fancybox http://fancyapps.com/fancybox/3/ |
修改 主題配置文件
1 | medium_zoom: true |
Pjax
當用户點擊鏈接,通過ajax更新頁面需要變化的部分,然後使用HTML5的pushState修改瀏覽器的URL地址。
這樣可以不用重複加載相同的資源(css/js), 從而提升網頁的加載速度。
1 | # Pjax [Beta] |
對於一些第三方插件,有些並不支持 pjax 。
你可以把網頁加入到 exclude 裏,這個網頁會被 pjax 排除在外。
點擊該網頁會重新加載網站
使用pjax後,一些自己DIY的js可能會無效,跳轉頁面時需要重新調用,請參考Pjax文檔
使用pjax後,一些個別頁面加載的js/css,將會改為所有頁面都加載
Butterfly的Pjax目前仍有一些問題,請留意
- 使用谷歌廣告可能會報錯(例如自動廣告)
如果你在使用中發現問題,歡迎反饋Bugs
Snackbar 彈窗
Snackbar 彈窗,根據自己愛好開啟
修改 主題配置文件
1 | # Snackbar 彈窗 |
未開啟Snackbar

開啟Snackbar
Instantpage
當鼠標懸停到鏈接上超過 65 毫秒時,Instantpage 會對該鏈接進行預加載,可以提升訪問速度。
修改配置文件
1 | # https://instant.page/ |
Pangu
如果你跟我一樣,每次看到網頁上的中文字和英文、數字、符號擠在一塊,就會坐立難安,忍不住想在它們之間加個空格。這個外掛正是你在網路世界走跳所需要的東西,它會自動替你在網頁中所有的中文字和半形的英文、數字、符號之間插入空白。
修改配置文件
1 | # https://github.com/vinta/pangu.js |
field只支持兩個參數,post(只在文章頁生效)和site(全站生效)
PWA
要為Butterfly配上 PWA 特性, 你需要如下幾個步驟:
打開 hexo 工作目錄
npm install hexo-offline --save或者yarn add hexo-offline在根目錄創建
hexo-offline.config.cjs文件,並增加以下內容。
1 | // offline config passed to workbox-build. |
更多內容請查看 hexo-offline的官方文檔
- 在
主題配置文件中開啟 pwa 選項。
1 | pwa: |
- 在創建
source/目錄中創建manifest.json文件。
1 | { |
你也可以通過 Web App Manifest快速創建manifest.json。(Web App Manifest 要求至少包含一個 512*512 像素的圖標)
可以通過
Chrome插件Lighthouse檢查 PWA 配置是否生效以及配置是否正確。- 打開博客頁面
- 啟動
Lighthouse插件 (Lighthouse插件要求至少包含一個 512*512 像素的圖標)
關於 PWA(漸進式增強 Web 應用)的更多內容請參閲 Google Tools for Web Developers
Open Graph
在 head 裏增加一些 meta 資料,例如縮略圖、標題、時間等等。當你分享網頁到一些平台時,平台會讀取 Open Graph 的內容,展示縮略圖,標題等等信息。
修改配置文件
1 | # Open graph meta tags |
CSS 前綴
有些 CSS 並不是所有瀏覽器都支持,需要增加對應的前綴才會生效。
開啟 css_prefix 後,會自動為一些 CSS 增加前綴。(會增加 20%的體積)
修改配置文件
1 | # Add the vendor prefixes to ensure compatibility |
Inject
2.3.0以上支持
如想添加額外的js/css/meta等等東西,可以在Inject裏添加,支持添加到head(</body>標籤之前)和bottom(</html>標籤之前)。
請注意:以標準的html格式添加內容
例如
1 | inject: |
留意: 如果你的網站根目錄不是’/‘,使用本地圖片時,需加上你的根目錄。
例如:網站是 https://yoursite.com/blog,引用css/xx.css,則設置為<link rel="stylesheet" href="/blog/css/xx.css">
CDN
配置文件中最後一部分CDN,裏面是主題所引用到的文件,可自行配置CDN。(非必要請勿修改,配置後請確認鏈接是否能訪問)
1 | CDN: |
| 參數 | 解釋 |
|---|---|
| internal_provider | 主題內部文件 |
| 可選 local/jsdelivr/unpkg/cdnjs/custom | |
lcoal 為本地加載,custom 為自定義格式,需配置 custom_format |
|
| 注意: 如果使用的是 Dev 版,只能設置為 local | |
| third_party_provider | 第三方文件 |
| 可選 local/jsdelivr/unpkg/cdnjs/custom | |
lcoal 為本地加載,custom 為自定義格式,需配置 custom_format |
|
注意: 如果你選擇 local 需要安裝 hexo-butterfly-extjs插件 |
|
| version | true/false 為 cdn 加上指定版本號 |
| custom_format | 自定義格式 |
| option | 你可以在這裏更換部分文件,會覆蓋原有的配置 |
version
如需修改版本號,可修改主題目錄的 ‘plugins.yml’ 中對應插件的 version
請確保你修改的版本號,你所使用的 cdn 有收錄
custom_format
提供以下參數
| 參數 | 解釋 |
|---|---|
| name | npm 上的包名 |
| file | npm 上的文件路徑 |
| min_file | npm 上的文件路徑(壓縮過的文件) |
| cdnjs_name | cdnjs 上的包名 |
| cdnjs_file | cdnjs 上的文件路徑 |
| min_cdnjs_file | cdnjs 上的文件路徑(壓縮過的文件) |
| version | 插件版本號 |
部分可用的第三方 CDN 列表
請確保你選擇的 CDN 有收錄主題使用的第三方插件


